
Adding Stop & Appointment Details
Level up your tracking with geofencing & predictive ETAs
After basic details are inputted in the 'Track Shipment' page, users are automatically redirected to input stop details on the load including addresses and appointment times.
MacroPoint automatically creates radius based geofences around the addresses of all stops to capture arrival & departures. The addresses, appointment times, and notes are also visible to the driver in the MacroPoint for Truckers app as your shipment is being tracked.
Start Date/Time and End Date/Time are not required but highly recommended as they're used to determine if shipments are off-schedule to proactively notify users and update color coding in the Control Tower. If you have a firm appointment for a stop the same time must be used for both Start and End (ex: 1/4/2024 1:00pm below). If you have a first-come-first-serve stop the window should be inputted. Off-schedule alerts are triggered based on the End Date/Time of the stop.

Once multiple addresses are inputted users can re-order by dragging the Tripsheet Stops, edit, add new stops, & delete stops on the shipment.
![]() icon allows users to drag stop to change orders.
icon allows users to drag stop to change orders.
![]() icon allows users to edit stop details like addresses & appointment times.
icon allows users to edit stop details like addresses & appointment times.
![]() icon allows users to delete stops.
icon allows users to delete stops.

Telematics (ELD & Trailer GPS) Tracking
Direct to Truck Tracking - No Apps Required
Tens of thousands of carriers have already integrated their telematics units to MacroPoint to empower their customers (YOU!) to leverage their tracking data seamlessly. If you haven't activated your telematics carrier yet, first check out our Telematics Self-Service page to learn more. Once carriers are connected to your account, they're available for tracking immediately.
Just like Rapid Track above, navigate to https://visibility.macropoint.com/ Click 'Track Shipment'
This time, first search the carrier's name you want to track under the 'Shipment Carrier' dropdown. A dynamic dropdown will populate allowing you to select the appropriate carrier.

Under the 'Tracking Method' dropdown, a dynamic list populates allowing users to select any trackable methods supported by the carrier.

If the Tracking Method selected is a telematics connection (ELD or GPS), all trackable truck and/or trailer numbers will display under the Select Telematics Locator drop down.

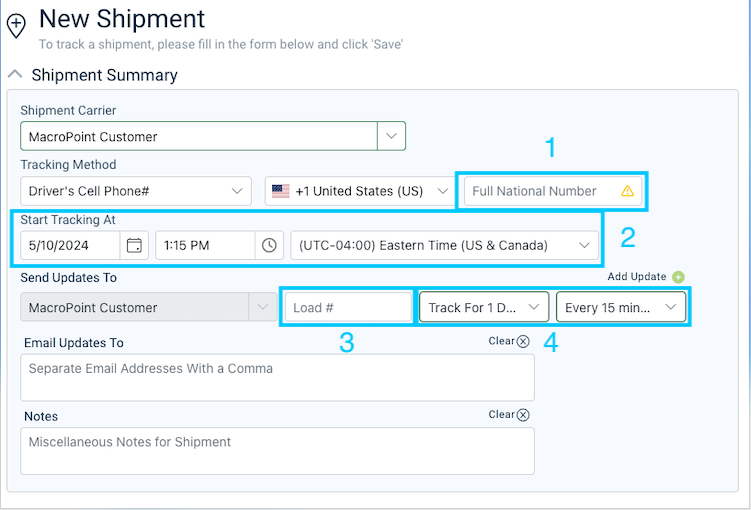
From here everything else is the same; input your internal load number under the 'Load #' field, select how long you want to track for & how frequent of updates you want. Click 'Save & Close'
Now you're trackin' with telematics 😎
User Defined Fields
Custom Data Points for Quick Filtering & Searching
User Defined Fields are custom data fields configurable on an account level by a MacroPoint representative. Once configured, users are able to manually input any or all fields with relevant data. Once saved, these fields displays on the Control Tower and Load Search screens giving users the ability to view, search, and filter by each field.
